Beer n Tech
Simple CI pipeline - Part 2 - Configuration
January 22, 2019
Welcome back
In part 1 of this tutorial we went through setting up a Digital ocean droplet, Docker hub , github repo and a Circle CI account to connect and get our latest code changes from repo and access our digital ocean droplet.
In this tutorial we will continue from that starting point and configure our Circle ci workflow to pull our latest changes, build our project , test it and deploy it via a docker image to our Digital Ocean droplet.
Before we get started configuring, you’ll need to make sure that the repo you used for the setup contains the following files:
- .circleci/config.yml
- Dockerfile
- package.json, with a “test” script defined.
If you don’t then you can fork and clone this repository which contains the basic structure and empty files needed.
Get yourself a cup of tea because this is quite a lengthy explanation.
Let’s get started!
Circle CI config
When we push code changes to our repo, Circle CI will get a notification that something has changed and that it needs to run it’s process.
First Circle CI pulls our latest code and then looks for a .circleci folder and a config.yml in it. It uses this config file to determine how it should run it’s deployment process.
We created a .circleci/config.yml file in our setup step. This time around we will edit this file to create a workflow that will do everything we need automatically everytime we push a code change to our repo.
The workflows are an ordered series of jobs defined in our config.yml file to achieve our deployment process. The jobs define the steps our process takes.
workflows order our jobs and jobs are a named collection of steps.
Our config.yml will look like the following when we are done:
version: 2
jobs:
  build:
    docker:
      - image: circleci/node:8
    environment:
      NODE_ENV: 'test'
    steps:
      - checkout
      - restore_cache:
          key: dependency-cache-{{ checksum "package.json" }}
      - run:
          name: Install Dependencies
          command: yarn install --production=false
      - save_cache:
          key: dependency-cache-{{ checksum "package.json" }}
          paths:
            - ./node_modules
      - run:
          name: Test
          command: yarn test
  deploy:
    docker:
      - image: circleci/node:7
    steps:
      - checkout
      - setup_remote_docker
      - run:
          name: Deploy image to Docker Hub
          command: |
            docker build --build-arg DOCKER_USER=$DOCKER_USER --build-arg DOCKER_PASSWORD=$DOCKER_PASSWORD -t oldtimerza/blade-express .
            docker login -u $DOCKER_USER -p $DOCKER_PASSWORD
            docker push oldtimerza/blade-express
      - run:
          name: Run docker image on Digital Ocean Droplet
          command: |
            ssh $SSH_USER@$SSH_HOST -o StrictHostKeyChecking=no 'docker stop app && docker rm $(docker ps -a -q) && docker rmi $(docker images -q) && docker pull oldtimerza/blade-express && docker run -d -t -p 80:3000 --name app oldtimerza/blade-express'

workflows:
  version: 2
  build-deploy:
    jobs:
      - build
      - deploy:
          requires:
            - build
          filters:
            branches:
              only: master
Let’s break it down.
Breakdown
Version
version: 2The version tag you see at the top is just there to tell Circle CI which version of it’s config format it needs to expect to understand what is to follow. In our case it is version 2.
Jobs
We have two jobs defined in our config file: build and deploy.
Build
build:
  docker:
    - image: circleci/node:8
  environment:
    NODE_ENV: 'test'
  steps:
    - checkout
    - restore_cache:
        key: dependency-cache-{{ checksum "package.json" }}
    - run:
        name: Install Dependencies
        command: yarn install --production=false
    - save_cache:
        key: dependency-cache-{{ checksum "package.json" }}
        paths:
          - ./node_modules
    - run:
        name: Test
        command: yarn test
In order for Circle CI to build and test our code it needs some kind of environment to do so.
How we’re doing it is to tell Circle CI to create an environment from a docker image with the right environment installed that we need to run our building and testing. That is precisely what this section does:
We use the Docker image created and maintained by the circleci team called circleci/node:8. This Docker container will have node version 8.x installed as well as yarn and some other useful stuff.
docker:
  - image: circleci/node:8
Next we setup some environment variables that our new container should have access to. We set our NODE_ENV variable to test. We do this so that our Node process knows to run in test mode.
environment:
  NODE_ENV: 'test'
Next we define the steps (the sequences of things to do) once Circle CI has created this environment and running inside it.
The first step in our job is checkout. This is a specific step that Circle CI picks up. It tells Circle CI to pull the latest code from our connected repo and switch to it’s master branch.
steps:
  - checkout
We have a weird step next. The restore_cache step.
- restore_cache:
    key: dependency-cache-{{ checksum "package.json" }}
This saves us time each subsquent build. Instead of Circle CI downloading and installing all our npm packages each time we build, we instead store our node_modules contents in a cache that Circle CI restores. We use the checksum of our package.json file as the key for the cache entry so that if the package.json contents change(i.e. we add a new package) the cache hit will miss and our node_modules content will not be restored and the packages(with the new additions) will be re-installed.
After that we define our first custom step. This step is a run step. A run step is a step that is a command for Circle CI to run in the terminal inside the build environment.
- run:
    name: Install Dependencies
    command: yarn install --production=false
run steps have a name and a command. The name is just a descriptor that Circle CI will use to display the console output of our command execution in a nice format on the dashboard. The command part is the actual text that Circle CI will enter into the terminal and execute.
In this case our run step is called Install Dependencies and it executes the yarn install —production=false command in the terminal. This step will essentially start a yarn installation process using our package.json file for our project.
We again have a weird caching step.
- save_cache:
    key: dependency-cache-{{ checksum "package.json" }}
    paths:
      - ./node_modules
You guessed it! This simply tells Circle CI to cache the contents of our node_modules content under a key made up of dependency-cache- and the checksum of our package.json file.
This is so next time we run this build process we will have those contents ready at hand and not have to re-download and install them.
Finally we run another run step.
- run:
    name: Test
    command: yarn test
This run step is quite obvious. It tells Circle CI to run our test script that we may have in our package.json. If the tests fail they will exit the process and Circle CI will fail our build automatically. MAGIC!
Deploy
deploy:
  docker:
    - image: circleci/node:7
  steps:
    - checkout
    - setup_remote_docker
    - run:
        name: Deploy image to Docker Hub
        command: |
          docker build --build-arg DOCKER_USER=$DOCKER_USER --build-arg DOCKER_PASSWORD=$DOCKER_PASSWORD -t oldtimerza/blade-express .
          docker login -u $DOCKER_USER -p $DOCKER_PASSWORD
          docker push oldtimerza/blade-express
    - run:
        name: Run docker image on Digital Ocean Droplet
        command: |
          ssh $SSH_USER@$SSH_HOST -o StrictHostKeyChecking=no 'docker stop app && docker rm $(docker ps -a -q) && docker rmi $(docker images -q) && docker pull oldtimerza/blade-express && docker run -d -t -p 80:3000 --name app oldtimerza/blade-express'
Similarly to the build job we did above we define the environment that wil be used to run these steps inside.
In this case we use circleci/node:7. (I don’t it’s important that it is a different version of node, but it’s good to show that different environments can be used per job).
Again we use the checkout step to get our latest code into this environment.
- setup_remote_dockerThe setup _remote _docker step is another pre-defined step specific to Circle CI.
This step creates a new docker container environment for us to setup our Docker image inside.
The reason we need this is because the environment that Circle CI is currently running our commands in is a Docker container.
This is a problem because Docker does not allow building docker images from inside a container.
So we tell Circle CI that we are going to run some docker build commands and that it needs to do this outside of this current container.
building/pushing images and running containers happens in the remote Docker Engine. More here
- run:
    name: Deploy image to Docker Hub
    command: |
      docker build --build-arg DOCKER_USER=$DOCKER_USER --build-arg DOCKER_PASSWORD=$DOCKER_PASSWORD -t oldtimerza/blade-express .
      docker login -u $DOCKER_USER -p $DOCKER_PASSWORD
      docker push oldtimerza/blade-express
As the name of this next step implies, we are going to build our Docker image and deploy it to our DockerHub.
The $TEXT are environment variables. We can set these environment vairables from our Circle CI dashboard and we’ll go through that part in a bit.
For now just remember that $TEXT are environment variables in our build environment.
$ENV_VARIABLE are Circle CI’s environment variables setup for use in this build environment from the dashboard.
What this command does in order.
docker build --build-arg DOCKER_USER=$DOCKER_USER --build-arg DOCKER_PASSWORD=$DOCKER_PASSWORD -t oldtimerza/blade-express .run docker build command, this tells docker to build our image using the config in our Dockerfile. (we will handle that later). —build-arg DOCKERUSER = $DOCKERUSER is a way to set variables that our Dockerfile needs to execute with.
In this instance we set our docker DOCKER_USER argument to be the environment variable that Circle CI provided.
We do the same for the password.
-t oldtimerza/blade-express is the tag(the name) of our docker image.
The .(dot) at the end is the path that Docker looks for stuff in, dot simply means this current directory.
docker login -u $DOCKER_USER -p $DOCKER_PASSWORDNext we log into our DockerHub account with the username and password provided by Circle CI environment variables.
docker push oldtimerza/blade-expressFinally we push this image to our DockerHub project repo. (named oldtimerza/blade-express in this example, but yours will be different from the setup stage)
- run:
    name: Run docker image on Digital Ocean Droplet
    command: |
      ssh $SSH_USER@$SSH_HOST -o StrictHostKeyChecking=no 'docker stop app && docker rm $(docker ps -a -q) && docker rmi $(docker images -q) && docker pull oldtimerza/blade-express && docker run -d -t -p 80:3000 --name app oldtimerza/blade-express'
Note: the ’ marks are important because we need all the docker commands to be run inside the SSH shell. Also take note of the $SSHUSER and $SSHHOST environment variables that we’ll need to configure from Circle CI’s dashboard.
This final step of the process will SSH into our Digital Ocean droplet, stop any currently running docker containers, remove any out-dated images and pull our latest image from our DockerHub into the droplet.
Then (while still SSH’ed in) we tell docker (on the droplet) to run our new image.
-p 80:3000 --name app oldtimerza/blade-express'-p 80:3000 tells Docker to connect the running containers port 3000 to the external hosts port 80.
We do this because our node process will be running on port 3000 but we want that to be accessed from port 80 (i.e. from the web).
—name app tells docker to call this running container “app” so that we can easily identify it should we need to.
oldtimerza/blade-express is the name of the image that docker should initialise a container with.
Workflows
workflows:
  version: 2
  build-deploy:
    jobs:
      - build
      - deploy:
          requires:
            - build
          filters:
            branches:
              only: master
As mentioned earlier workflows define the order that our defined jobs should be run in.
version: 2The version of workflows that Circle CI should expect to see. We use version 2. Don’t worry too much about it.
build-deploy:
  jobs:
    - build
    - deploy:
        requires:
          - build
        filters:
          branches:
            only: master
build-deploy is the name of the workflow that will appear in our Circle CI logs on the dashboard.
jobs is the ordered list of our defined jobs. First we run the build job.
Then we run the deploy job. However. Notice the requires part. This tells Circle CI to only run deploy if our build job completed successfully.
Remember what I mentioned about tests earlier? This step is crucial as it only allows the deploy job to run if our tests all passed during the build job.
The filters sections basically tells Circle CI to only do the jobs on our main branch of repository.
The Last stage of our journey will be to configure our Dockerfile so that Docker knows what to include in ,and how to create, our image.
Dockerfile config
Our Dockerfile will look like the following when we are done:
FROM node:8.11.3-alpine

ARG DOCKER_USER
ARG DOCKER_PASSWORD

RUN mkdir -p /usr/src/app
WORKDIR /usr/src/app

COPY . /usr/src/app

RUN yarn install

ENV NODE_ENV=production
ENV DOCKER_USER=$DOCKER_USER
ENV DOCKER_PASSWORD=$DOCKER_PASSWORD

EXPOSE 3000
CMD [ "yarn", "start" ]
FROM node:8.11.3-alpineThis tells docker to get a base image to expand upon, in our case we get one of node’s base images.
ARG DOCKER_USER
ARG DOCKER_PASSWORD
These are the arguments that docker expects to build this image with. We passed these in earlier from Circle CI with the —build-arg arguments on our docker build command.
RUN mkdir -p /usr/src/app
WORKDIR /usr/src/app

COPY . /usr/src/app
RUN tells Docker to run the mkdir command and creates a directory usr/src/app for us. WORKDIR tells Docker to change our current working directory to this new dir.
COPY . /usr/src/app tells Docker to copy all files from our current directory (denoted by the .dot) into our newly created directory in our Docker image.
RUN yarn installagain we use Dockers RUN command to execute yarn install which will download and install all our necessary npm packages inside our image.
ENV NODE_ENV=production
ENV DOCKER_USER=$DOCKER_USER
ENV DOCKER_PASSWORD=$DOCKER_PASSWORD
We setup some environment variables for image , we set node to production mode.
We set our DOCKER_USER to the user we accepted as a build argument in our docker build command and similarly for our password.
EXPOSE 3000
CMD [ "yarn", "start" ]
Lastly we EXPOSE the image’s port 3000 so that Docker can map to our port 80 defined earlier during our Circle CI docker build command.
Finally CMD.This is important
Essentialy what this is , is an ordered list of commands that Docker will run in our container when it is created from this image.
In this instance it will run yarn start when a container made from this image is created and started.
This runs our npm start script defined in our package.json. Normally this script is where you would put your applications starting commands. Usually starting a node process with an express server or something similar.
The only thing left to do now is to setup our Circle CI environment variables to pass into this process.
The final hurdle: Circle CI Environment variables
Login to your Circle CI account.
Once in the dashboard head over to Settings -> Projects (Under Organizations) and click the little cog icon next to the project we setup in step one of this tutorial.
You should end up here:
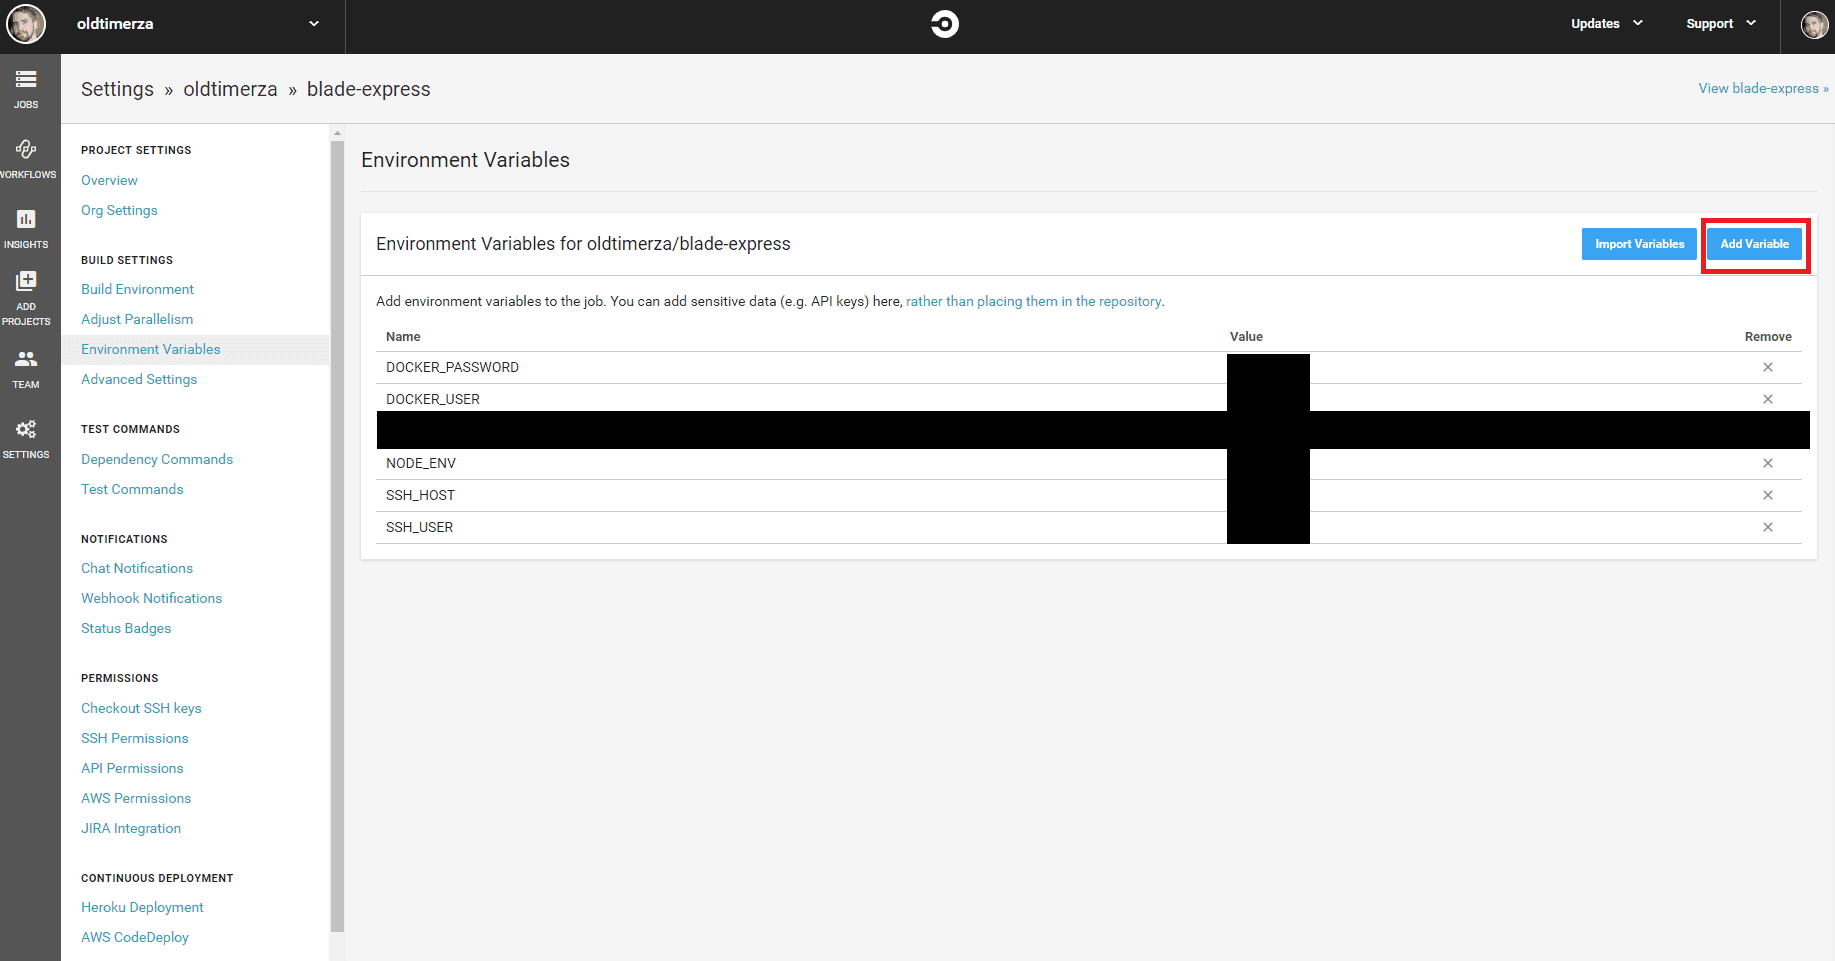
Click the Add Variable button to create a variable for each of the following:
- DOCKER_PASSWORD : The password you used for your DockerHub account login.
- DOCKER_USER : The username you used for your DockerHub account login.
- NODE_ENV : Set to “production” (without the quotes obvs.)
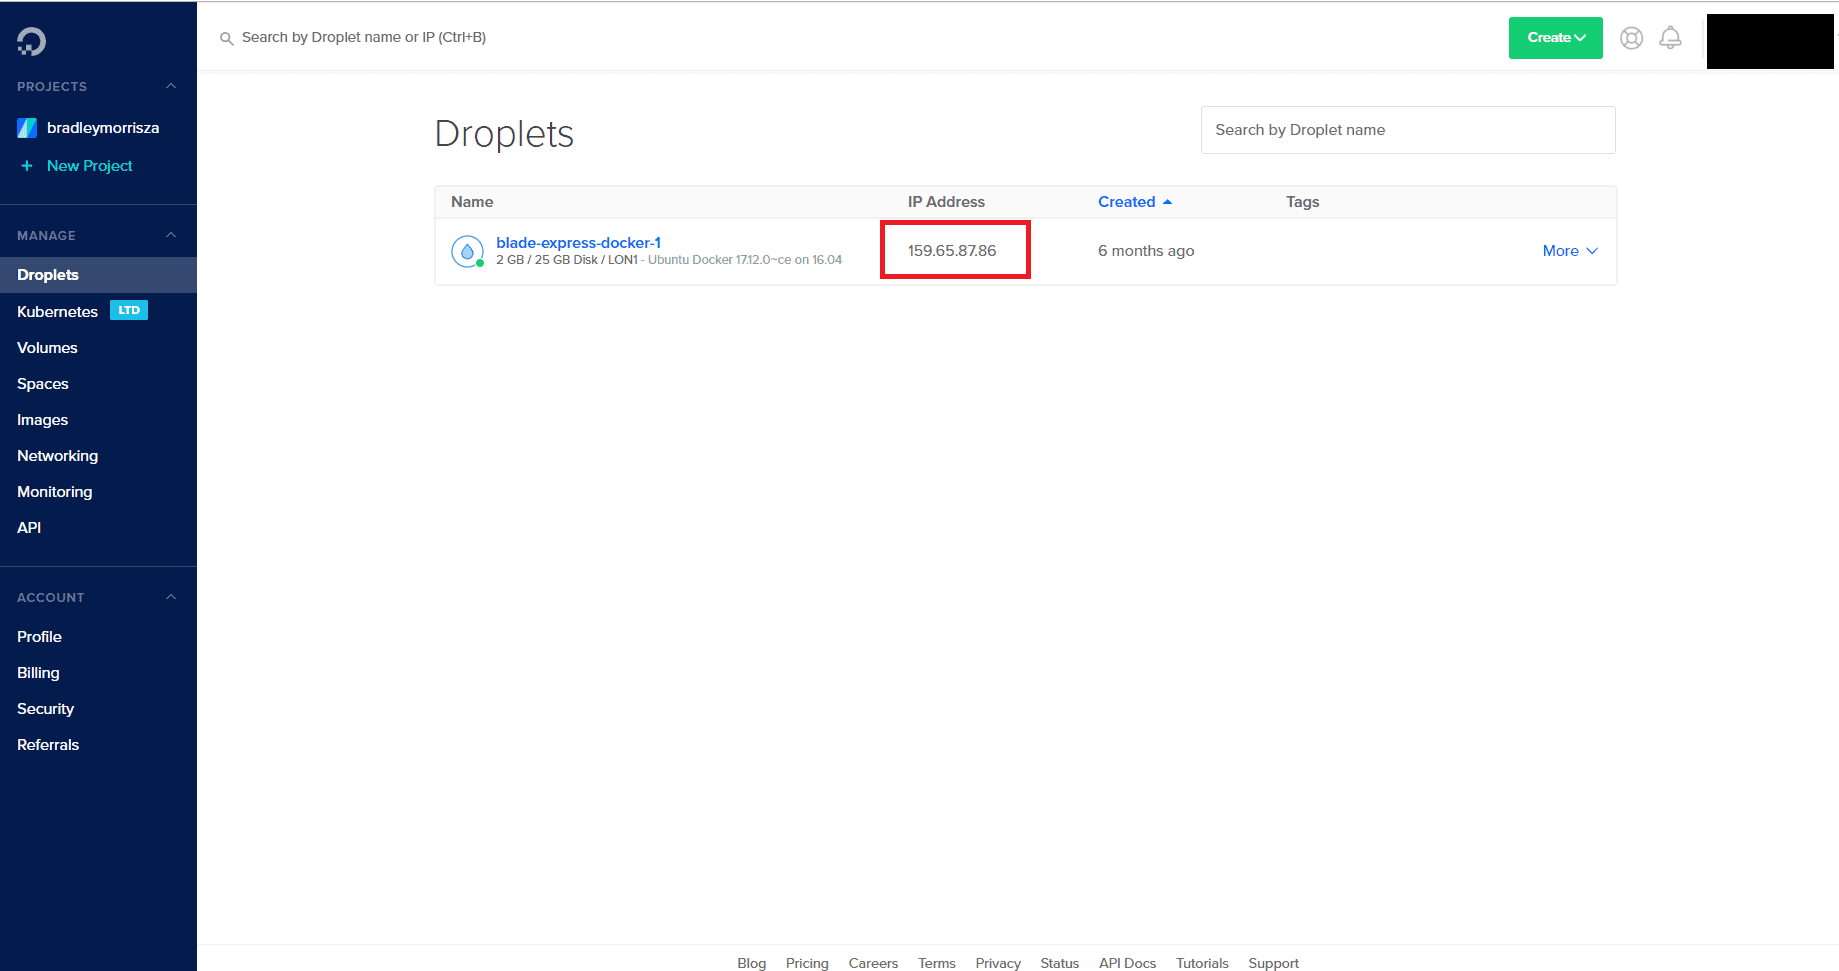
- SSH_HOST : The IP address of our Digital Ocean droplet. See the image below to see where to get it.
- SSH_USER : Set to “root” , this is the user we will SSH into our droplet with. Ubuntu root will give us admin level priviliges on our Digital Ocean droplet.
The IP address of our droplet, it will require you to login into your Digital Ocean account and look at your Droplets screen.
And with this we are finally finished with our journey.
You now have a pipeline setup that can pull your latest code changes, build it, test it, deploy it, and run it on a droplet.
I hope this tutorial has been helpful. Watch out for the final part Lights, Camera, Hello World! where I will create and deploy a simple example project to demonstrate a working sample.

Written by Bradley Morris. Software engineer interested in modern web tech